Installing Amper's analog aggregator with cellular

Before you begin...

Set your teams up for success
  1. Schedule time to turn off machines if required. We recommend you plan in advance so that you can safely open up the machines' power panels.
  2. Plan installation time with maintenance staff. You’ll need a team member who is familiar with the machines' operations and electrical panels.
information
Installation on 2 machines should take about 30–60 minutes.

Make sure to discuss availability with any relevant staff for successful installation.

What you'll need

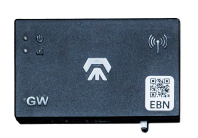
Gateway
(“GW” on device)
Aggregator
(“AG” on device with 8 sensor ports)
Sensor
Power supply cable
CAT5 cable
Recommended tools
  • Tools to open the appropriate machine panel
  • A machine schematic or wiring diagram

CONNECT THE GATEWAY

Plug power supply into AC outlet and gateway
  • This requires a 110V outlet.
    An outlet that is always powered on is preferred, but a built-in outlet on the machine will work. If no outlet is available, you'll need to run an additional outlet to the machine.
  • The gateway’s top LED light will turn blue when powered on.
Mount gateway
  • Once it's plugged in and powered on, mount the gateway as high as possible on a wall or machine exterior.
    Do not place the gateway in the machine's e-panel.
  • The gateway should still be able to reach the machine’s power panel with the 25’ CAT5 cable.
  • The gateway will automatically try to connect to your area’s cellular network.
  • The bottom LED light will illuminate based on the signal strength. If it is red, find a position where it changes to yellow or green (usually higher up).

INSTALL THE AGGREGATOR

Mount aggregator

Place the aggregator inside the machine’s power panel.
Mounting it closer to where you will connect the sensors will make the process easier.

Connect aggregator and gateway

Identify or create a port in the machine's power panel for the CAT5 cable to pass through.

Plug the CAT5 cable into the gateway, run it through the port, and connect it to the aggregator you mounted there in the previous step.

    Clip sensor

    Clip the sensor over a wire carrying AC power to the motor performing the primary process of the machine (e.g. spindle motor power supply output).

    If there are multiple wires for the 3 AC phases providing power to the same motor, pick any wire. The wire must only contain a single phase of power and not have a ground inside.

      Plug sensor into aggregator

      Plug the sensor cable into the aggregator’s first available port.

      If you have multiple sensors, start at port 1 and plug the rest into the subsequent ports until they’re all connected.

        Verify connections
        • The gateway should show a blue power light and green or yellow signal light.
        • The aggregator should show a blue power light (bottom left) and a blue connection light under each connected analog port used (top).

        COMPLETE CONFIGURATION

        Set up your machine in the Amper app
        • Go to https://app.amper.xyz (or click button below).
        • Go to Settings > Hardware Screen if you're not automatically directed to the instructions.
        • Click "new machine" to begin configuration. The app will guide you through entering your machine information.
        • Click the “notify us” button at the top right of the page to tell us your machines are ready for calibration.
          Only see a “reconfigure” button? Click it and it will change to “notify us.” Click it again and you’re ready to go.
        Sit back

        Once you submit your machine configuration info, our team will begin tuning your machines and setting up your dashboard. This typically takes 1 week for pilots and 14-21 days for larger full deployments.